
By guest contributor Ergest Xheblati
Recently I was asked by Tiago to see if I could do something interesting with his Instapaper article collection stored on Evernote. I had recently completed a similar project at work where I looked at product descriptions and generated tags from them. I thought I could do something similar for Tiago’s project.
My favorite tool for doing this is Knime which is a free, visual data science platform with all the capabilities you need for doing NLP (Natural Language Processing). I thought that I could use the LDA algorithm in Knime in order to do unsupervised (aka unaided) topic discovery. Unsupervised simply means that the algorithm is discovering the topics without being told about them beforehand so it doesn’t need any examples to learn from.
The intuition behind the algorithm is quite simple though the statistics are not. Given a group of documents, assume that there’s only a small number of topics or themes in the documents and that words in the documents can be attributed to the topics. So the output of the algorithm is a collection of topics labeled topic_1, topic_2…topic_n (because it doesn’t know what they actually are) and for each topic a group of words that make up that topic.
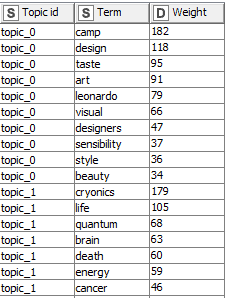
Here’s the output:
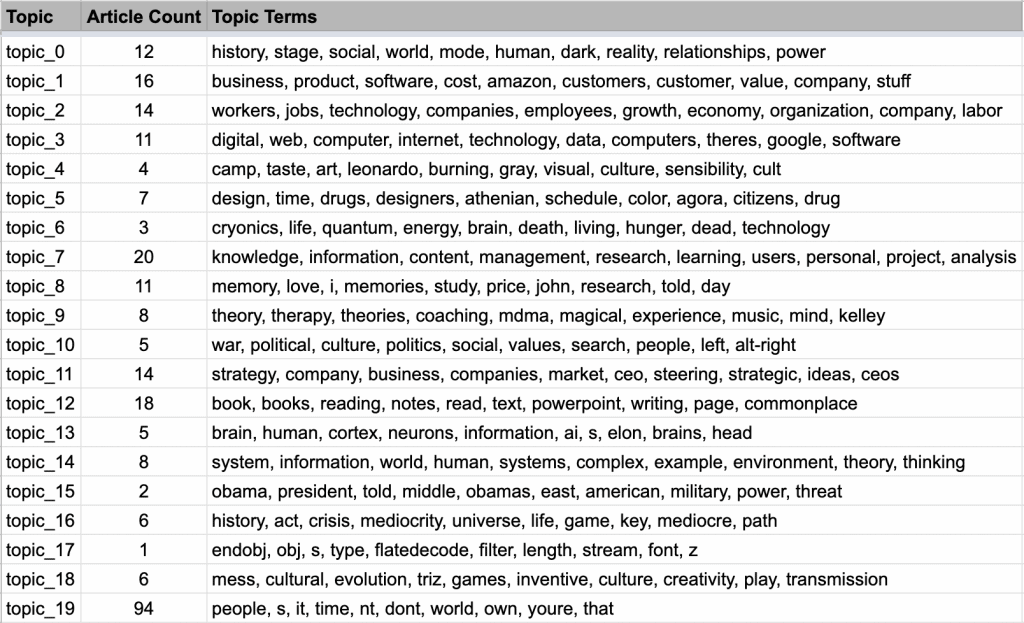
You can see that some of the topics are quite sharp (topic 6 is about knowledge management which is Tiago’s specialty, topic 9 is about books and reading, topic 8 is about companies and businesses. You can also see some not very sharp topics such as topic 17 which is quite miscellaneous. So how was this done?
Step 1: Obtaining the data
In order to get the articles, Tiago shared his Evernote notebook with me where he had all the articles saved. At first glance the work looked insurmountable. The documents were basically a title, a short description and a link to the original article. I thought I’d have to code something up to read data from the Evernote API. However, once I discovered that the Evernote desktop application has the ability to export all the documents as html files, things got really exciting.
I exported all the Evernote documents into html files and got to work creating the visual workflow to read and process them in Knime. Here’s a screenshot of the workflow

The workflow begins with a node to get a list of all the exported html files. The list is necessary because the way you work with data is by processing one row at a time and to read the files you’d need to know their location in your computer. This node outputs a table with the file names and location in the computer drive. By double-clicking the node, you get the configuration screen where you can set the folder and the file types.

Now that we have the list of files and their location, it’s time to actually read and parse the contents of each file.
Since the files are mainly Instapaper URLs, what we need to do is extract the article’s title and the Instapaper URL for each one so that later we can go to that URL and grab the actual contents.
The next node does all that. It’s actually a metanode, which means it’s a collection of other nodes. I use it here to organize the workflow into logical steps. Double-clicking this node, will get us inside the node so we can see the process. In Knime, you can nest several meta-nodes together into a logical workflow that makes it easy to read, understand and debug the workflow later.
Here’s a screenshot of the nodes inside so you can see what’s happening
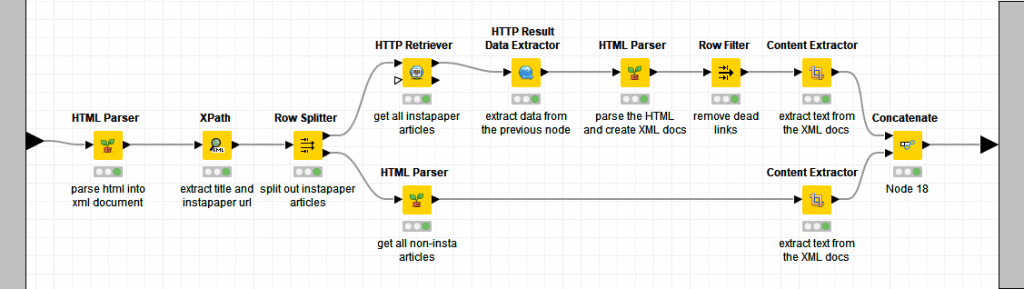
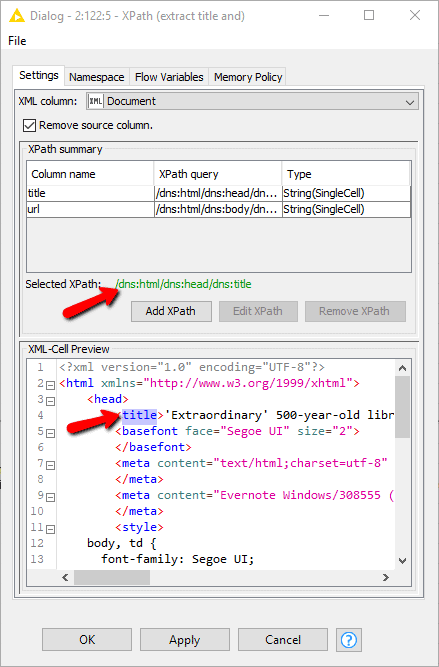
All these nodes are part of the Palladian plugin for Knime that needs to be downloaded and installed before running. The HTML Parser node takes the URL of the file from the File List node and reads the HTML. We then use Xpath node to extract the title of the article and the Instapaper URL.
What is Xpath? It’s a language similar to regular expressions that’s used to navigate and extract the elements of XML or HTML files. You can read more about it here: https://www.w3schools.com/xml/xml_xpath.asp
But here’s the cool part.
You don’t need to understand it to use this node. You simply click on the element you want and it automatically generates the Xpath expression for you. Just click Add XPath to add new columns. It’s very convenient. You can extract as many elements as you want in a single node.
The first time I ran this node, I noticed that some of the articles were not from Instapaper and the full text of the article was actually in the HTML file itself, so I split the workflow into two paths to process them separately. For the Instapaper articles on the top workflow section, we need to actually open the Instapaper URL to get the article text.
For that we need to use both the HTTP Retriever node and the HTTP Result Extractor node to actually go to the article’s page and read the HTML of each. Once that’s done, we filter out the dead links (empty results or 404 errors) and finally use the Content Extractor node to get the text of the article. The output is a document for each row. For the non-Instapaper articles, we already have the HTML, so all we need to do is to run the Content Extractor node (See Fig 3.)
Step 2: Preprocessing Text
Now that we have documents, we want to clean them up a little before running them through LDA. Typically in NLP text processing, we want to do things like remove very common terms (like and, the, not, etc) because they contain no useful information for our purposes.
Remember, we are starting from the assumption that there are several topics in our corpus of documents and words like and, the, not don’t tell us anything about the topics in the corpus. In NLP terminology, these words are known as stopwords and they are often filtered out.
Alright, let’s take a look at how the text cleaning meta-node works.
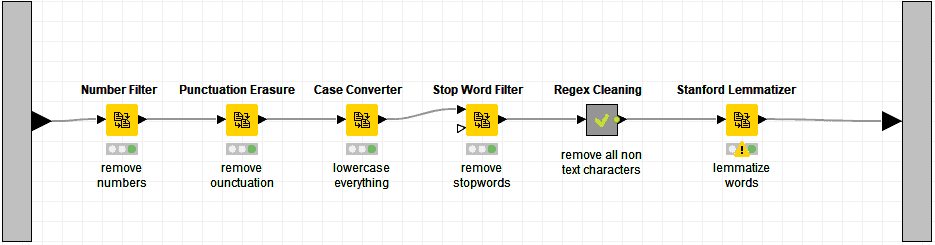
All the above nodes take a document as input, which is exactly what the Content Extractor node created for us. So the first step we’re doing is to remove numerical values. Numbers are usually meaningless in text processing so they’re always filtered out.
Next we remove punctuation, so a term like “really?” becomes “really” and “I’ve” becomes “Ive.” Computers need to be told about this stuff explicitly otherwise they’ll assume that really? and really are two unique terms.
After this, we convert all the words to lowercase so that words like “Really” and “really” are the same from the algorithm’s standpoint. Again, we’re making it easy for the algorithm to do the right thing for us.
We talked about stopwords above so we want to filter them out here. In the next step, I put all the text through a custom cleanup node to remove other non-text characters using regular expressions.
Finally we run everything through the Stanford Lemmatizer node, which essentially removes inflectional forms of the words. This way, verbs like am, was, be all become be. More details can be found here: https://nlp.stanford.edu/IR-book/html/htmledition/stemming-and-lemmatization-1.html.
As you can see, just preparing the data in an “easy-to-digest” format for algorithms to “consume” is quite time intensive, in fact it makes up about 80% of the work in machine learning/data science today. Don’t believe for a second that AI is going to take over the world any time soon 😀
Step 3: Topic Discovery
We are now finally ready to do the actual work, to “bake the cake” if you will. All the preparatory work we did so far was done to get better results from the Topic Extractor (Parallel LDA) node, but this is where the actual magic happens.
You don’t really have to understand exactly how the algorithm words in order to be able to use it, just like you don’t need to know how an engine works in order to drive a car, but you do need to understand it’s settings.
The Topic Extractor node has a few parameters:

First it requires a document column as input, which comes as the output from the previous node. You then have to set 4 parameters (also known as hyperparameters). Some algorithms can have hundreds, or even thousands of these hyperparameters and finding the right combination is very hard. There’s an art and science behind it known as hyperparameter tuning, but we don’t need to get into that here. If you’re curious: https://en.wikipedia.org/wiki/Hyperparameter_optimization.
The ones we care about the most are the No of topics and the No of words per topic.
How do you determine the best numbers to provide here? Well there’s no exact science for this, so you’d have to play around with the settings and look at different outputs. It’s also important to notice the Seed: setting, which also affects the output a lot. I usually don’t change the Alpha and Beta settings but you could try different ones and see what you get.
One of the drawbacks of this algorithm is that it’s a little unstable, in the sense that every time you run it, you can get different results. Every time you change a setting you get different results. The output also requires human interpretation which could invite bias in the findings. Yet, this algorithm is quite powerful and can help guide you if you have nothing to start with.
There are three outputs from the node:
1. The first output is the table with all the documents and all the topics as columns. The numbers in the topics indicate the probability that the document belongs to that topic. The one with the highest value becomes the assigned topic for that document. This can be interesting to explore because some documents could equally fit in two or three topics.

2. The second output is the topic terms with one term per row and a column called weight. We don’t need to worry about the weight here.
3. The third output is more technical and I will not cover it as we don’t need it.
Now that we have the output we want to present it in a nicer way, like I did in the table above. To do that, we have to do a little grouping and concatenating of the terms. Knime does this with the very powerful GroupBy node.
There are two GroupBy nodes in Figure 1 at the top of this post. The top one counts how many documents the topic belongs to and the bottom one concatenates all the terms above so we only get one row per topic. Finally, the joiner node works like a database table join, combining the two tables into a single output as shown below.

These terms can now be further processed by an external tool so they can be added to the documents as tags, or they can be input for another algorithm inside of Knime. In one of the applications I did, I labeled the topics by hand, grabbed a group of 200 documents for each of the labeled topics and used that as a training set to find more documents with the same topic in a supervised classification process also done in Knime.
I have attached here the Knime workflow which includes the exported documents so you have everything to run this workflow on your own computer and modify it to see what it does. One of the cool things about Knime is that you can run the workflow in steps and Knime will save the intermediary results, so you don’t have to rerun the entire thing each time you make changes.
Enjoy!
Follow us for the latest updates and insights around productivity and Building a Second Brain on X, Facebook, Instagram, LinkedIn, and YouTube. And if you're ready to start building your Second Brain, get the book and learn the proven method to organize your digital life and unlock your creative potential.