
This guide details the exact gear I used to make my personal documentary film Wayne Lacson Forte: On My Way To Me. For the full story behind the film, read here.
My priorities were:
- The most minimal and affordable gear possible, since this was an experiment
- Products that were highly adaptable and could be repurposed for other uses
- Products that were as lightweight, compact, and portable as possible, since I knew I’d be traveling with this gear
- A filming setup I could easily carry and operate completely on my own, without requiring other people
I was surprised to discover that there were essentially only 4 categories of gear I needed:
- Camera
- Microphone
- Tripod
- Video-editing software
Below I’ve explained each item I used in my own film project, how I used it, and whether I would use it again. I’ve included “basic” and “advanced” options, labeled accessories as “required” or “optional,” and suggested alternatives when possible.
Here’s the complete kit, with affiliate links to buy each item:
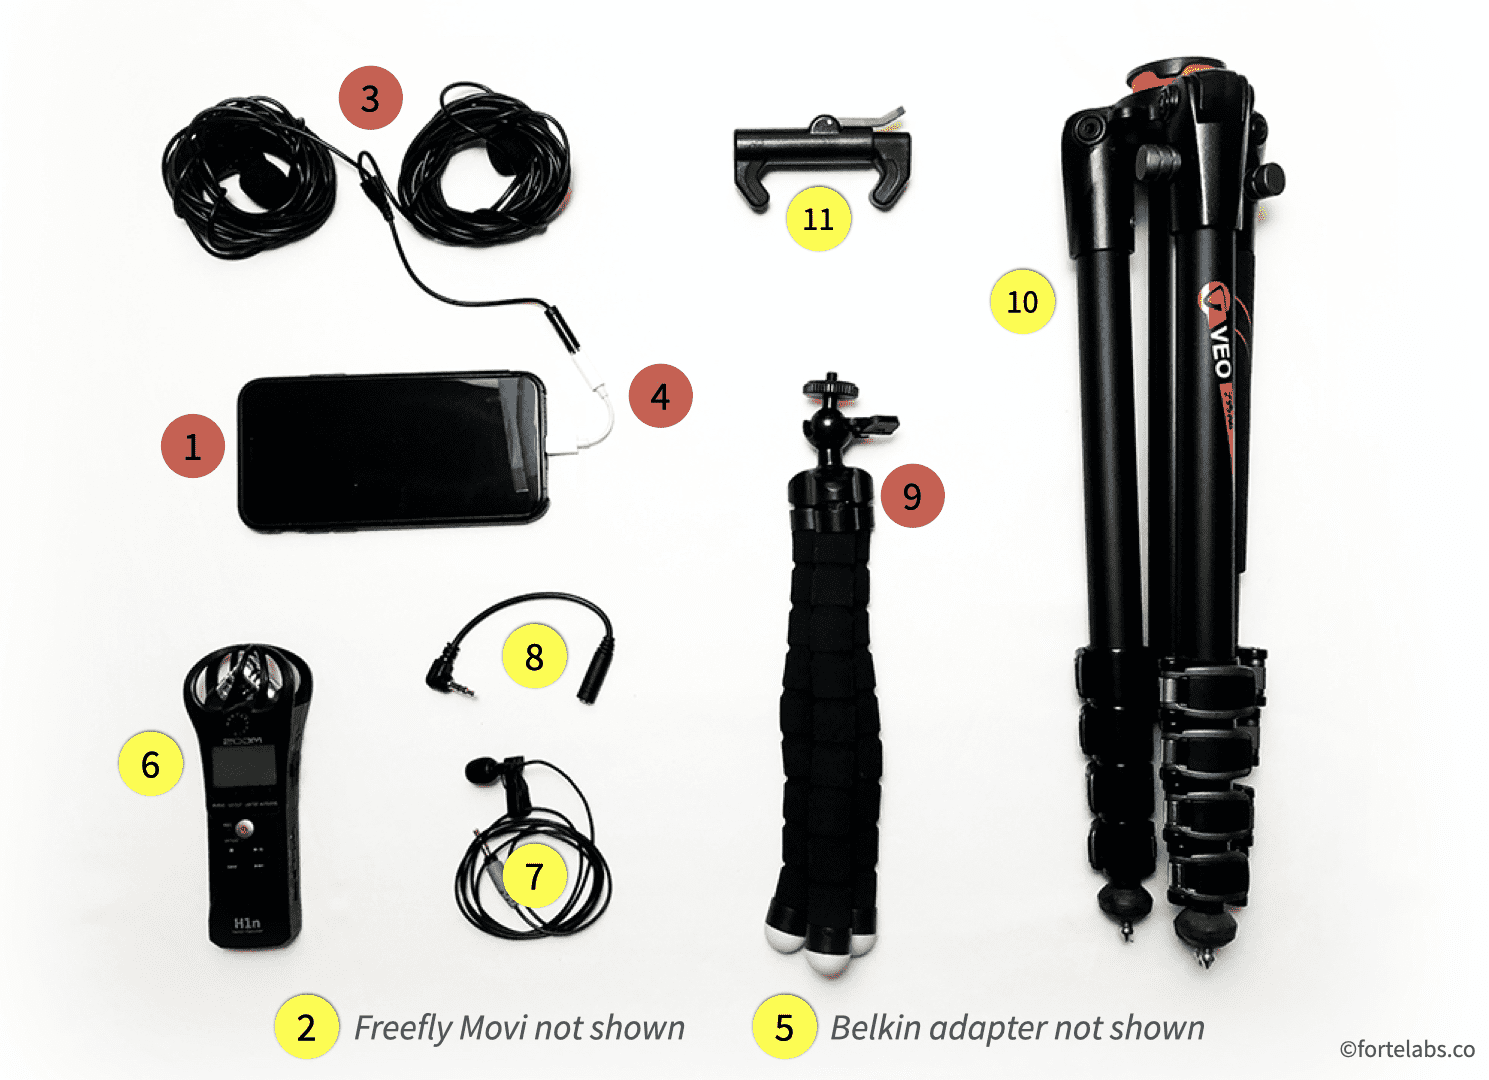
#1 Camera (smartphone + $300)
- 1. Camera: Apple iPhone 10 XS, 512 GB storage capacity $1,350
- 2. Freefly Movi Cinema Robot Smartphone Stabilizer $300
Optional accessory for use with any smartphone
#2 Microphone ($27-275)
- 3. Basic option: PoP voice Premium 16 Feet Dual-Head Lavalier Microphone $19
- 4. Apple Lightning to 3.5 mm Headphone Jack Adapter ($8) $8
Required accessory for PoP voice mic
- 5. Belkin F8J212btWHT 3.5mm Audio + Charge $39
Optional accessory for PoP voice mic
- 6. Advanced option: Zoom H1n Portable Recorder $120
- 7. Rode SmartLav+ Omnidirectional Lavalier Microphone $76
Required accessory for Zoom H1n
- 8. Movo MC4 TRRS to TRS Adapter $13
Required accessory for Zoom H1n
#3 Tripod ($20-198)
#4 Video-editing software ($300 + $32/mo)
The total cost of the items above was $2,416. $1,350 of that was the smartphone, which most people are likely to have already. Which means that beyond the phone, my total expenditure was only $1,066.
If cost is your main concern, and you already have a smartphone, you could do perfectly fine with this alternative kit of the essentials, for as little as $47:
Essentials kit ($47)
- 1. Basic option: PoP voice Premium 16 Feet Dual-Head Lavalier Microphone $19
- 2. Apple Lightning to 3.5 mm Headphone Jack Adapter ($8) $8
Required accessory for PoP voice mic
- 3. Basic option: UBeesize Mini Tripod S $20
- 4. Free video-editing program $0
Pre-installed programs like Apple iMovie or Microsoft Movie Maker, programs with free versions such as DaVinci Resolve, or open-source programs like OpenShot or Kdenlive
Read on for my full recommendations and lessons learned.
The Camera
Apple iPhone 10 XS, 512 GB storage capacity ($1,350)
The first and most important element of your personal documentary filmmaking kit is your smartphone. This is your camera, main storage device, and note-taking tool. It’s also the device you’re most likely to already have.
The good news is that almost any recent model smartphone will do just fine. The latest generation models from Samsung, Apple, and others now come with HD (or higher) resolution cameras, advanced algorithms for calibrating exposure and color, plenty of storage space, and increasingly, professional-grade and wide-angle lenses built right into the phone. To my amazement, I found I didn’t need lights or exposure calibration for the great majority of situations, because there was so much intelligence built right into the phone’s default camera app.
I opted for the most recent Apple iPhone at the time, which was the iPhone Xs. I wanted the smaller size so that I could always carry it in my pocket, and sprung for the largest capacity version which was 512 GB. I wanted all the space I could get, since I would be filming at 4K resolution (4 times standard HD quality).
A minute of footage at 4K and 30 frames-per-second takes up 170 MB of space. So the approximately 30 hours of total raw footage I recorded took up about 300 GB. You could get away with less if you regularly offload clips onto your computer, but I didn’t want to worry about running out of space.
In retrospect, I would have chosen the larger size iPhone Xs Max, because it’s hard to see what you’re recording clearly on a smaller screen. If you’re in the market for a new smartphone, I’d also consider less expensive alternatives such as Android phones. I’ve heard you can get similar quality for much less money.
Verdict: the smartphone is the central element of your kit, and it’s worth investing in the largest size and highest storage capacity you can afford, especially since you need a smartphone anyway.
Optional accessory: Freefly Movi Cinema Robot Smartphone Stabilizer ($300)
I had previously experimented with a stabilizer, often known as a “gimbal,” during a video shoot I was working on last year. Within a couple minutes of playing with it, I saw the potential. The Movi allows you to mount a smartphone and then stabilizes the phone as you move, so your shots look smooth instead of jerky. This lends a much more polished, cinematic feel to the footage.
Although I had a lot of fun with this device, I ended up not using it very much. It is bulky and awkwardly shaped, with a carrying case the size of a small toolbox. Even when I remembered to bring it with me, setting it up took a couple minutes and as time passed I increasingly chose just to spontaneously start filming rather than get it out.
Plus, the built-in video stabilization that now comes standard on smartphones is so good that it’s difficult to tell which shots were stabilized by the Movi, and which by the phone itself. As long as you don’t have very jerky movements, the phone can automatically detect movement and stabilize your shots for you. Adobe Premiere also has a tool called a “warp stabilizer” that allows you to add stabilization later.
Verdict: the Movi was an entertaining experiment, but isn’t really necessary to film a personal documentary now that smartphones have built-in stabilization.
Here’s a good third-party review of the Movi if you want to know more:
The Microphone
BASIC OPTION: POP VOICE PREMIUM 16 FEET DUAL-HEAD LAVALIER MICROPHONE ($19)
The one thing that software can’t do is record high-quality audio. There is no algorithm or plugin that can correct bad audio afterward if the original recording wasn’t good. That’s why having an external mic is crucial.
As cool as wireless mics are, they are also a bit cumbersome. You have to make sure they have charged batteries, that the settings are correct, that the input levels are right, that the person has the lavalier mic threaded up through their shirt, that it’s positioned close to their mouth, etc. It’s a lot to remember and set up, and highly prone to error.
I started my project using the wireless Zoom H1n described below, but midway through I discovered a much simpler solution: a wired microphone that directly connects to the smartphone. It honestly couldn’t be easier: you plug one end into the adapter below, which then goes straight into the lightning jack. The other end is a lapel mic that can be threaded up through the subject’s shirt and clipped to their lapel.
The only downside is that there is a wire, but if you’re within 16 feet of the subject and not moving around, that’s not an issue. This also means that the audio is already synchronized to the video, meaning you don’t need the Pluraleyes plugin detailed below (and can save $300).
I chose this 16-foot cable so I wouldn’t have to worry about the length, and a double-sided version so I could record a two-person interview or conversation (or myself asking the questions). It worked beautifully, was impossible to mess up, and if I had to do it again I’d be tempted to try and use this mic alone.
Verdict: if you want to economize or just keep things simple, and don’t absolutely need wireless recording, I’d go with this product for your audio needs.
The video below shows how this microphone works:
REQUIRED ACCESSORY: APPLE LIGHTNING TO 3.5 MM HEADPHONE JACK ADAPTER ($8)
You’ll need this adapter to connect the wired mic above to your smartphone. It is the standard Apple adapter for connecting standard (3.5mm) audio cables to the lightning port on Apple mobile devices.
OPTIONAL ACCESSORY: BELKIN F8J212BTWHT 3.5MM AUDIO + CHARGE ($39)
I haven’t used it myself, but I’ve seen many others suggest this alternative adapter from Belkin that allows you to charge the phone while recording, which is very useful since there is only one lightning port available.
ADVANCED OPTION: ZOOM H1N PORTABLE RECORDER ($120)
The Zoom H1n is an industry standard that I’ve seen recommended by many videomakers. It’s small, lightweight, versatile, and not too expensive. I bought it on the recommendation of a videographer friend, who suggested I use it with the Rode SmartLav+ lavalier microphone below so that I could record audio wirelessly. Wireless recording comes in handy if you want to be able to move while filming or if you won’t be close to your subject at all times.
The H1n records in WAV or MP3 formats, has several built-in features for things like limiting wind noises, and requires a microSD card which you use to transfer the audio files to your computer. There are lots of other technical details and settings available for this device, but the important thing to know is that it records at more than enough quality for any video project you might want to take on.
The one mistake I made with the H1n was relying on the “auto-levels” feature. The device can detect the volume of the person speaking and automatically adjust the input levels, but it takes several seconds. My dad has a pretty loud voice, so in many clips the first few seconds were too loud as the audio “peaked” and got distorted. I suggest adjusting the audio levels manually, and looking out for the red warning light on the front of the device which indicates peaking. Unfortunately your ability to fix peaking after the fact is limited.
Verdict: an external mic of some kind is essential. If you’re going to be filming outside, while moving, or in situations where the subject isn’t close to you, then you’ll need a wireless solution. The Zoom H1n is an effective choice, and I’d definitely use it again.
Here’s a good review of the Zoom H1n if you’d like to know more:
REQUIRED ACCESSORY: RODE SMARTLAV+ OMNIDIRECTIONAL LAVALIER MICROPHONE ($76)
The SmartLav+ will be needed if you want to use the Zoom H1n described above. The SmartLav+ is a “lavalier” (or “lav”) microphone that plugs into the H1n, and can then be threaded up the subject’s shirt and clipped to their lapel so it’s nearly invisible. Ideal placement is about 6 inches from their mouth, pointed down (not up, which tends to cause peaking).
An alternative would be a “directional” mic, which can be mounted on the top of a camera, or held slightly offscreen by an assistant. But I was using a smartphone as a camera, and wouldn’t have anyone helping me, so I went with the lav mic.
Watch the video below for an in-depth overview of how to use the SmartLav+:
REQUIRED ACCESSORY: MOVO MC4 TRRS TO TRS ADAPTER ($13)
This adapter is needed to connect the SmartLav+ to the H1n, both described above. I don’t really understand the details of why, but I can assure you it’s not optional. One of the biggest mistakes I made was forgetting to use this adapter for a two-hour, very meaningful interview with my dad. The recording didn’t have good enough audio, and I ended up not being able to use most of the footage as a result, which was very disappointing.
The Tripod
BASIC OPTION: UBEESIZE MINI TRIPOD S ($20)
On some occasions I didn’t want to bring the Vanguard tripod, or just didn’t happen to have it with me when a good opportunity came up. In such situations, the UBeesize came in handy. It’s tiny and weighs almost nothing, with adjustable legs and a mount that fits most phones. I filmed several interviews by putting this mini tripod on a table.
Verdict: as a cheaper and smaller alternative to the Vanguard tripod, or as a backup, this mini tripod is very useful to have.
This video shows an unboxing and basic how-to for this tiny tripod:
ADVANCED OPTION: VANGUARD VEO 235AB ALUMINUM TRAVEL TRIPOD ($150)
I knew from the beginning of this project that I needed everything to be compact and ultra-portable. I would be flying to California from my home in Mexico City, and also knew it was likely I would want to film during trips we had planned to Brazil and the Philippines.
This tripod is a professional-quality piece of equipment, and folds up into a very small package that can fit in a small suitcase or backpack. I used it anytime I needed a fixed shot, such as for interviews or time-lapses. It has adjustable legs and adjustable height, up to about 6 feet tall, which is eye level.
Verdict: for a full-featured professional tripod that is also small and light, I highly recommend the VEO. Especially since it can be used with different cameras and will serve you for many years in a wide variety of situations.
Watch the video below for a review of the Vanguard VEO 235AB:
REQUIRED ACCESSORY: GLIF QUICK RELEASE TRIPOD MOUNT FOR SMARTPHONES ($28)
You’ll need the Glif to mount your smartphone to the Vanguard tripod above. Most tripods only come with mounts for dedicated photo and video cameras, if any at all. The Glif is very simple to use and fits any size phone with an adjustable slider. It has threads on both sides that screw directly onto a standard screw mount.
Watch this video for an overview of the Glif mount:
Video-editing software
ADOBE PREMIERE PRO SUBSCRIPTION ($32/MO)
I’ve long used Adobe’s Creative Suite of apps, which are by far the industry standard for photo-editing, video-editing, illustration, and other media.
Creative Suite programs can be bloated with too many features, which makes them a challenge to learn. But by sticking with Adobe, you know that the program will always be supported and compatible with the widest array of formats and plugins (such as Pluraleyes, which I discuss below).
I pay for it as part of Adobe’s annual Creative Cloud subscription, but you can also pay for it with a monthly subscription of $32 per month. If you can squeeze your editing into just a month or two, this cost will be significantly less. You could even use that as an accountability tool to get it done faster!
You could also use free video-editing programs such as Apple iMovie or Microsoft Movie Maker, programs with free versions such as DaVinci Resolve, or open-source programs like OpenShot or Kdenlive. Although I can’t vouch for their quality or compatibility.
Verdict: it’s hard to go wrong with the industry standard for creative software. You’ll need to watch some YouTube videos to learn how to use it, but it’s a worthwhile investment to learn the basics of video editing.
OPTIONAL ACCESSORY: RED GIANT PLURALEYES 4 ($300)
While it’s nice to have a wireless audio recording device like the H1n, it also introduces a problem: you have to “sync” the audio from the external mic to the video being recorded by your phone. In the past, this required techniques like the stereotypical black-and-white “clapper” seen in Hollywood movies, or in more modern times, simply clapping your hands a couple times in front of the camera so that you can match the audio to the video later.
But if you’d like to do that matching automatically, there is now a very nifty software tool called Pluraleyes. It is kind of magical honestly. You just dump all the video footage you have into a project timeline in Adobe Premiere, then dump all the audio you have into the same timeline, hit a button, and 30 seconds later…voila! All the audio is perfectly synchronized to the video. This saves hours of highly tedious and error-prone manual matching, and I highly recommend it if you’re using an external mic apart from your phone.
Verdict: while expensive, Pluraleyes will save you many hours that are much better spent on creative editing.
Here’s a demo of how to synchronize your audio using Pluraleyes 4 from within Adobe Premiere:
To get an idea of what it looks like to synchronize manually or using Premiere’s built-in tools, watch this video which demonstrates a few different methods:
Go forth and film
That’s the kit!
For a relatively small investment of between $79–$1,066 beyond a smartphone you likely already have, you can create a film that just 10 years ago would have been completely out of reach of anyone except professionals.
The one other expense I had beyond the gear described above was a couple hours of consultation with an experienced videographer. I hired a friend of mine to walk me through the basics of Adobe Premiere on Zoom for $150 (2 hours at $75 per hour). Although this was very helpful, it ended up being mostly a form of accountability and encouragement for me. The basics of Premiere can be learned easily and for free by watching a few YouTube videos.
We are living in the midst of a quiet revolution in filmmaking. The tools to create beautiful, immersive, moving long-form stories with video are no longer limited to the few.
We have the opportunity and the responsibility to take advantage of the powerful cameras we carry in our pockets and the multimedia studios in our computers to tell the kinds of stories we want to see in the world.
And don’t forget to have fun!
Follow us for the latest updates and insights around productivity and Building a Second Brain on X, Facebook, Instagram, LinkedIn, and YouTube. And if you’re ready to start building your Second Brain, get the book and learn the proven method to organize your digital life and unlock your creative potential.
- Posted in Creativity, How-To Guides, Video-making, Videos
- On
- BY Tiago Forte